Our Favorite Coconut Cream Pie Recipe
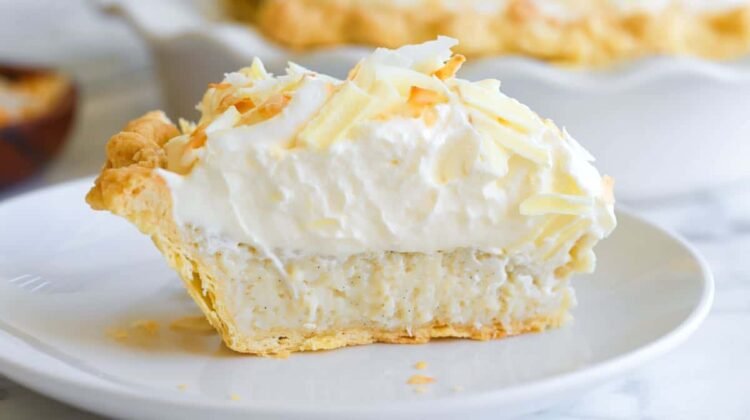
You’ll use coconut three ways for this incredibly delicious coconut cream pie. Get ready for a cloud of sweet cream with toasted coconut atop a creamy, coconut-packed filling and buttery, flaky crust.

The joy that I feel after making this coconut pie recipe is real! It’s a bit of a process, but worth every step, and even though it has quite a few of them, the steps are absolutely doable! Promise. You can break this pie down into three parts: the crust, the coconut filling, and the whipped sweet cream topping.
If you love cream pies and coconut, this coconut cream pie is an absolute must-try! I’d happily skip every birthday cake from now on for this pie. It’s stunning, and genuinely hard to resist when it’s sitting in the fridge, which by the way is another bonus. It lasts up to 4 days in your fridge! For more cream pies, I love this Banana Cream Pie so much that I’m already contemplating a banana-coconut combo, and this Fresh Strawberry Pie has been a reader favorite for years!
Key Ingredients
- Pie Crust: You can use homemade or store-bought pie crust. I use my favorite Flaky Butter Pie Crust to make this coconut cream pie. It’s made with butter and turns out light and flaky, which is perfect with the creamy filling. My recipe makes enough for 2 pies, but you can use half the batch and freeze the remaining dough for another day.
- Coconut Milk and Regular Milk: Use full-fat canned coconut milk for this pie (light coconut milk won’t work as well). We mix the coconut milk with regular milk for the filling.
- Coconut: In the filling, we use shredded sweetened coconut, then for the topping, we love the larger coconut flakes (mine are from Bob’s Red Mill). If you want only to use one variety, stick with the shredded sweetened coconut, as the larger flakes are just for visual appeal. I have tried this filling with unsweetened shredded coconut, and it definitely works, but they are slightly more gritty and less sweet in the filling.
- Vanilla Bean and Vanilla Extract: We use a vanilla bean for the filling and love the slightly richer vanilla flavor it adds. That said, you can skip it for vanilla bean paste or vanilla extract. Tips for how much to use are below the recipe.
- Eggs and Flour: These are what thicken our coconut custard filling.
- Heavy Cream: The sweet cream topping starts with cream. You want it cold and with a high fat content, so look for “heavy cream” or “heavy whipping cream.”
- Sugar: You’ll add plain granulated sugar to the filling and the sweet cream topping. It’s the sugar that helps stabilize the whipped cream, making it last well into day 4 in the fridge.
- White Chocolate: Adding white chocolate shavings to the top was inspired by a mini coconut cream pie I had at Dahlia Bakery in Seattle. They’re pretty famous (and for good reason). They add white chocolate, and it always stuck with me, so here I am today suggesting you do the same for your pie!
Find the full recipe with measurements below.
How to Make Homemade Coconut Cream Pie
It’s hard to resist this coconut cream pie! Just thinking of it makes my mouth water. Don’t be turned off by the length of our recipe below. Each step is easy to do (promise). Here are a few tips to help you along:
Tip 1: Prevent your crust from shrinking. If you are starting with a homemade crust, you’ll need to roll it out, form it into your pie dish, and then crimp the edges. A common issue with homemade butter crusts is that they can shrink when baked. To prevent this, we recommend two things: first, chill the crust in the pie dish for at least 30 minutes. Second, take extra time to build up the edges of the crust. You can either fold the excess dough underneath itself and crimp it, or roll out a second crust and add strips of dough to the edges. This extra thickness around the border will prevent the pie from shrinking.
Tip 2: Take care when tempering your eggs. To make the coconut filling, you’ll heat coconut milk, milk, and vanilla before mixing it with whisked eggs, flour, and sugar. If you were to dump the hot coconut milk into the eggs, they’d scramble. To prevent this, slowly whisk a small amount of the hot mixture into the eggs, then repeat. This process gently raises their temperature without scrambling them. It’s easy, but when you get to this step, take a moment to prepare by re-reading the recipe step so it all goes smoothly.

Tip 3: Chill the pie overnight. Chilling the pie is my least favorite part of the recipe, and once you take your first bite, I think you’ll understand why. Just like with cheesecake or peanut butter pie, the filling needs time to set fully. So, you must refrigerate your pie overnight to firm up properly. It’s a hard wait, but worth it in the end.
Tip 4: Keep the pie chilled until serving. For the best texture, cream pies need to stay chilled. Otherwise, the filling and whipped cream will soften. The great news is that this pie keeps beautifully in the fridge. I’ve had it in there for up to 4 days and still loved every bite.


Our Favorite Coconut Cream Pie
This incredible coconut cream pie celebrates coconut three ways. We use shredded coconut and full-fat coconut milk for the filling, then top it all with a mountain of sweet cream and toasted coconut flakes for crunch.
We love shredded sweetened coconut for the coconut filling and the larger coconut flakes for the topping. If you’d prefer to stick with one, use shredded sweetened coconut for both. For more cream pies, we also LOVE this Homemade Banana Cream Pie.
Makes 1 (9-inch) pie, 8 to 10 slices
You Will Need
For the Pie
1 (9-inch) batch Homemade Flaky Pie Crust
1 (15oz) can full-fat coconut milk
3 ounces (88ml) whole milk, 6 tablespoons
2 cups (170g) shredded sweetened coconut, lightly packed
1 vanilla bean, cut in half lengthways with the seeds scraped out
3 large eggs
1/2 cup (100g) granulated sugar
3 ½ tablespoons (28g) all-purpose flour
For the Sweet Cream Topping
2 cups (470ml) cold heavy cream
1/3 cup (67g) granulated sugar
1 teaspoon vanilla extract
4 tablespoons (15g) unsweetened large coconut flakes, lightly toasted
1 ounce (28g) white chocolate, shaved
Directions
- Prepare the Crust
1Roll out the pie dough: If using a recipe that makes two crusts, roll out one of the chilled disks of dough (about half of your pie dough). Keep the other half in the refrigerator. Roll the dough, turning it a quarter turn after every other roll, until you have a circle about 12 inches in diameter.
2Line the pie dish: Gently press the dough into your pie dish, lining the bottom and sides. Be careful not to pull or stretch the dough, as this can cause it to shrink during baking.
3Build up the sides: To prevent the crust from shrinking, fold the edges of the dough underneath itself to create a thicker border that rests on the lip of the dish. Then, crimp the edges as desired. If you do not have enough dough to really build up the sides, roll out the second dough disk and cut strips to add to the edges. Building the sides helps prevent the pie from shrinking as it bakes. To see me rolling and crimping, watch the video in our recipe for Flaky Pie Crust.
4Chill the crust: Slide the unbaked pie crust into the refrigerator and chill for at least 30 minutes.
- Bake the Crust
1Preheat the oven: While the crust is chilling, preheat your oven to 375°F (190°C).
2Bake the crust (phase 1): Pierce the bottom of the chilled crust all over with a fork. Crumple up a sheet of parchment paper in your hands, then uncrumple it and use it to line the crust. Fill with pie weights, dried rice, or dried beans. Bake for 15 minutes.
3Bake the crust (phase 2): Carefully remove the crust from the oven and lift out the parchment paper and weights. Return the crust to the oven and continue to bake until it is light golden brown, about 15 to 20 minutes more. Set aside to cool.
- Make the Coconut Cream Filling and Chill
1Heat the coconut mixture: In a medium saucepan, combine the full-fat coconut milk, whole milk, shredded sweetened coconut, and the seeds and pod from one vanilla bean. Cook over medium heat, bringing the mixture to a simmer.
2Prepare the egg mixture: While the coconut mixture is heating, whisk the eggs, 1/2 cup of granulated sugar, and all-purpose flour together in a medium bowl until smooth.
3Temper the eggs: Remove the vanilla bean pod from the hot coconut milk. While continuously whisking the egg mixture, slowly pour a small amount of the hot coconut milk into the eggs. Continue to slowly stream in the hot mixture, whisking constantly, until about three-quarters of the coconut milk has been incorporated. This process gradually raises the temperature of the eggs without scrambling them.
4Thicken the filling: Still whisking, pour the tempered egg mixture back into the saucepan with the remaining coconut milk. Place the pot back over medium heat and cook, stirring the entire time, until the mixture is thick and smooth, about 3 to 5 minutes. Stirring the whole time prevents the eggs from scrambling.
5Fill the crust: Pour the hot coconut filling into the baked pie crust.
6Chill overnight: Place plastic wrap or a round of parchment paper directly on top of the coconut filling to prevent a skin from forming (see tips for making a parchment paper round). Refrigerate the pie overnight, or for at least 8 hours, until the filling is fully set.
- Finish and Serve
1Make the sweet cream topping: Place the heavy cream in the bowl of a stand mixer fitted with the whisk attachment. Whisk on high speed, slowly adding 1/3 cup of sugar. Once the cream forms soft peaks, add the vanilla extract and continue to whip to very stiff peaks. Refrigerate the whipped cream until you are ready to top the pie.
2Finish the pie: Gently peel the parchment paper round from the top of the chilled pie. Mound the whipped cream on top and use the back of a spoon to spread it over the filling, creating swirls and swoops. Scatter the toasted coconut flakes and shaved white chocolate all over the whipped cream. Refrigerate the pie until you are ready to serve.
Adam and Joanne’s Tips
- Storing: Once fully assembled, coconut cream pie lasts in the refrigerator for up to 4 days. The crust holds up well, but becomes slightly less crisp towards the fourth day.
- Make the crust days or months in advance: Follow the crust recipe and shape the dough in your pie dish. Cover it tightly with plastic wrap and refrigerate for up to 3 days. To freeze it, follow the crust recipe and shape the dough in your pie dish. Freeze it uncovered until it’s completely solid. Then, carefully transfer the frozen crust into a freezer-safe bag or wrap it well in foil and plastic wrap. Freeze for up to 3 months. When you’re ready to use it, let it thaw in the refrigerator for a couple of hours before blind baking.
- Vanilla bean substitute: Use 2 teaspoons vanilla bean paste or vanilla extract.
- Make a parchment paper round: Fold a sheet of parchment paper in half, then into a triangle. Hold the point of the triangle toward the center of your 9-inch pie dish and cut the parchment where it meets the outside edge of the dish. Unfold the paper and check that the round fits nicely inside the edges of the dish. Trim to fit if needed. Save it for covering the coconut cream later on.
- Toast the coconut flakes: Add the unsweetened large coconut flakes to a dry skillet over medium heat. Cook, stirring often, until lightly toasted. Remove the toasted flakes from the skillet and set them aside.
- The nutrition facts provided are estimates.
Nutrition Per Serving
Serving Size
1 of 10 total slices
/
Calories
512
/
Total Fat
35.5g
/
Saturated Fat
25.6g
/
Cholesterol
108.8mg
/
Sodium
147.6mg
/
Carbohydrate
44.7g
/
Dietary Fiber
1.5g
/
Total Sugars
28.7g
/
Protein
6.3g


